Background

Monday, January 21, 2013

Use Your Stash Blog Hop!!!


If you are joining us for the "Use Your Stash Blog Hop" you are right on track. WELCOME! You should be coming from Judy Faye's blog.

There are 5 participants this month. If you get lost along the way you can see the entire list of hoppers on Rachel's Blog. Let's get started.

Today I am showcasing using the awesome quilling tool to make those beautiful paper flowers SO very easy to roll up! Here are the simple steps I used. Seriously easy!


First, I cut out the flower and leaves with the CTMH Art Philosophy Cricut cartridge.  Then, I crumpled up the flower.  :o)  No, this is not a necessary step.  I was trying to make it look older and well worn.


Don't mind my chipped nail polish.  LOL  The quilling tool has a slit in the end where the end of the paper flower slips into.  Then, it's just as easy as rolling it up!


Once it is all wound up, I unwind it just a bit until it looks close to what I want.


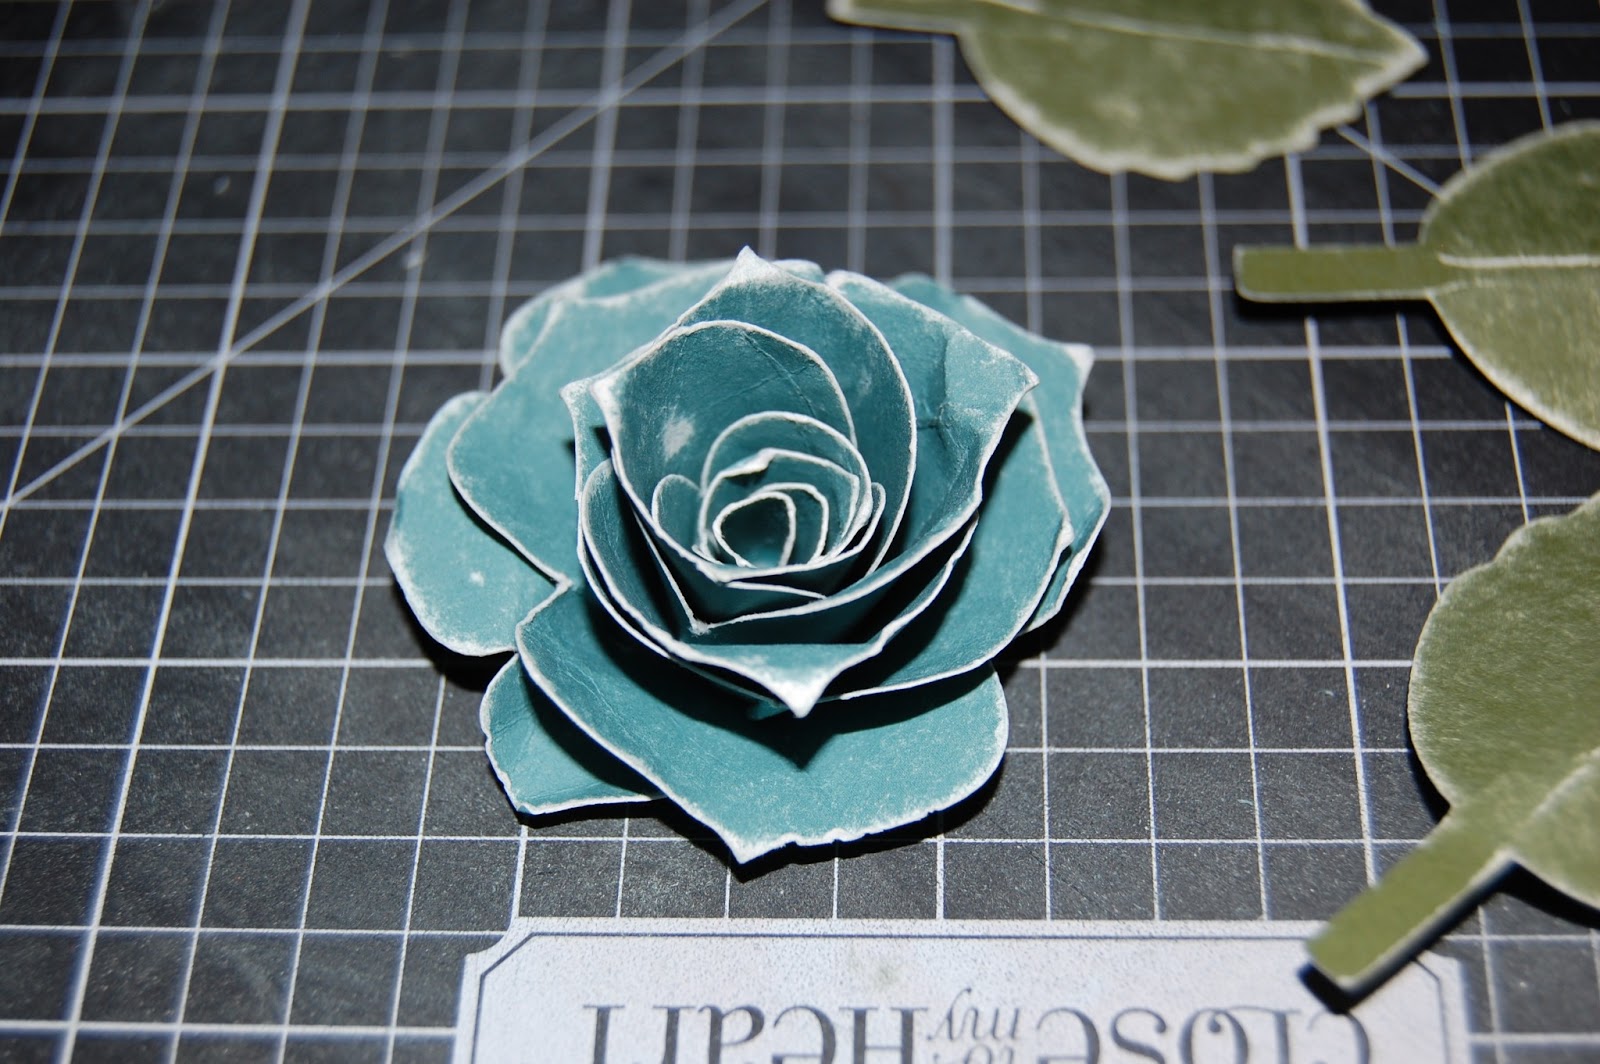
To finish it, I just use some liquid glass on the flower base, and glue it down. I set it aside to dry while I finish the rest of the card. I sanded the leaves, folded them in half and sanded that lightly, too.


 Okay, so I don't know what happened to that picture, but I used the Clementine paper to cover the card base. The design of the card was taken out of the Wishes card book. I used some Cashmere card stock and used the stamp of the month to stamp the roses on it. I cut the sentiment tag out with the CTMH Art Philosophy Cricut cartridge, and used a sentiment from the stamp of the month, also. I love it!!!

Now hop on over to Joy's blog for more ideas of using up your stash.

Happy Crafting!

Cherri

Saturday, January 19, 2013

Hanging on to Christmas

Hi!  I had really meant to share this with y'all in December, but, um, it was crazy busy!  So, I figured it would be nice to look back on Christmas and begin sharing ideas for next time.  :o)  I really love the way these wreaths turned out.  I made them to sell at a craft fair, and people loved them.


This wreath was definitely the favorite, and got the most attention.  I sold out of it pretty quickly!  :o)  I used the Tim Holtz nutcracker die cut, and the leaves from his Holly Branch die cut.  I used the CTMH Art Philosophy Cricut cartridge to make the poinsettias.


I cut the leaves out of Tim Holtz Glassine paper, and used gold and different green color alcohol inks to give them a guilded look.


This little man was so much fun to create!!!  After I cut him out of grunge paper, I painted the different parts with acrylic paint, and after the pieces dried, I sanded them and inked over them with a brown ink to give it a well worn appearance.  :o)  I love it!!!


After cutting out the flowers, I embossed them with a fun folder that seemed to fit.  Then, I swiped over the top of them with gold paint, stacked them, and added some glimmery brads.  LOVE IT!!!


This wreath is one of those that is hard to photograph and really get across what it looks like in person.  Every part of it, except the wreath itself, either sparkles or is snow covered!


The most noticeable sparkle is the Noel die cut (do I need to mention it's a Tim Holtz die cut, too?  LOL.)  I love the was it shimmers!  What is less noticeable is the rosettes.  I used white picket fence Stickles to bring shine to their centers, and sprayed the rosettes with Perfect Pearls.  And guess what?!  The pinecones are paper, too!  After creating them, I used Liquid Applique to make them snow covered!!!  People couldn't believe they were paper pinecones!  :o)


These chip board snowflakes sure were fun!  They are from CTMH.  I painted them white, just to make them the shade of white I wanted, then I used Glossy Accents all over them and coated them with Diamond Dust.  They turned out so cool!


I decided to do a bright, whimsical wreath, too.  I took the color combination from some jingle bells I have had for a long while.  I used the Tim Holtz Pine Tree die cut, and the Reindeer die cut, too.  The flourishes are some old chip board shapes I have had for years from CTMH.  They are, sadly, retired.

I painted both the flourishes and the reindeer with Crackle Paint, and I tied pieces of twill in a fun bright pink onto the reindeer.  :o)  So much fun!  I used baker's twine from CTMH to add the jingle bells that were the inspiration for this one.  It just brings a smile to my face!

I am very sure I will be creating something for my door for Valentine's Day.  I'll be sure to share with you when I do!
I promise I haven't forgotten that I told you I would share with you the neat trick to get those paper flowers done in a snap.  Check back with my next post on the 22nd!  :o)

Happy crafting!!!

Cherri

Monday, January 14, 2013

Hello, friends!  I have some really fun things to show you coming up, so I thought I'd give you a little sneak peak of one of the cards.


It's a simple card, but I am going to be showing you a fabulously EASY way to make these darling flowers!
 

I used the Clementine paper pack from Close To My Heart.  I really like the shades of brown this has along with orangy pinks.  They are definitely not the traditional Valentine's Day colors, and I think that makes it the perfect paper.  :o)

I'll be sharing pictures of the steps to make this flower so easy, you'll add them to nearly everything (like I do!!!  LOL)

Remember, the current Close To My Heart catalog will be done at the end of the month and lots of the products will be retiring.  So...if there is anything you have been wanting, or anything you want to stock up on, go to my website and have it shipped directly to you!  :o)

Happy Crafting!!!

Cherri